Showing posts with label nails. Show all posts
Tuesday, 21 May 2013

Disapointing NOTD: Barry M & Model's Own

I love painting my nails and I'm a sucker for any type of nail gimmick but here are my nail polish disapointments.


So whilst I was browsing the Barry M stand in Superdrug, I couldn't help but be lured in by the Sequin Nail Effects in colour SNP1 and in all honesty, I wish I'd never bothered:

Barry M Sequin Nail Effects SNP1

The first top coat wasn't too bad, but didn't give the effect I had in mind (white nails with rainbow sparkles please). I also was not best pleased with the sand like texture but battled on and applied a second coat to see if it got any better:

Barry M Sequin Nail Effects SNP1
It looks like a pixie threw up on my nails

The second coat made my nails look worse, not better! The rainbow sparkles clumped together and the white sandy texture was rough and uneven.

I'm not quite sure what went wrong with this nail varnish; was it the sandy texture? or the clumpy sequins? or the white base coat?

There's far too much going on with this polish; perhaps had it been a rainbow sequin topcoat, it would have worked much better.

I'm probably going to throw this sequin nail effect polish out and I most definitely wouldn't recommend buying the range. 


My second nail disappointment comes in the form of Model's Own Neon Ice in Toxic Apple:

Model's Own Neon Ice in Toxic Apple

Now, there's nothing wrong with this varnish per say... It applied like a dream and gave off a great neon glow after just two coats. I suppose this is a personal dislike; the nails really stood out so much that I got a headache looking at them.

My headache got so bad that I had to do something to tone the neon down:

Model's Own Neon Ice in Toxic Apple which matches an RS
Do I match the car or does the car match me?

I managed to turn the overly neon into a cool bit of nail art which looked so much better and got me loads of compliments.


Model's Own promised neon colour, and they delivered... it just wasn't for me. I might be swayed into buying a different neon colour but this Toxic Apple will be banished to the nail art drawer.
Friday, 15 March 2013

Red Nose Nails!


Hello and Happy Red Nose Day!

I think you must've been living under a rock to not have noticed the build up to Comic Reliefs' Red Nose Day. Whether your office has dressed up, you've watched the charity specials or you're sporting a Dinoroar red nose, the giving spirit is in the air and it's easy to get involved.

Whilst I would normally by a nose or t-shirt from TK Maxx, something caught my eye whilst I was shopping in Claire's...


...RED NOSE NAIL WRAPS!


These designer nail wraps are a Claire's Accessories exclusive and a £1 donation will be made to Comic Relief from the sale of the nail wraps.

A close up of nails with red nose day nail wraps on

Every year there's a theme surrounding Red Nose Day and this year's theme is Dinosaurs which I absolutely adore! There are three characters; Triceytops (on my index finger, far right), T-Spex (on my ring finger), and Dinomite (on my little and middle fingers). Dinomite is definitely my favourite. I love his smile!


A hand with red nose day nail wraps on the nails


In the pack of nail wraps, there are 16 transfers and a nail file and pointed stick to push back cuticles and press down the transfers.  

To apply, you first buff the nail, then wipe with acetone to clean the nail before applying the transfer. To finish you use the nail file included to shape the transfer to your nail. The whole process took me around 20 minutes as it's quite tricky to apply the transfer without any bubbles. 

I also had a little trouble getting the right size transfer for my nail size and as a result, some of the transfer overlaps onto my skin or you can see part of my nail.

Overall, I'm pretty happy with my nails, they make me giggle like a kid when I look at them and they've been on for 5 days so far with no problems.


But nail wraps weren't the only thing I bought....


...POM POM GOOGLY EYED RED NOSE HAIR ELASTICS

Roxy with her hair in pigtails with two pom poms securing the hair. The pom poms have googly eyes and are red to celebrate red nose day.

(I'm actually just a big kid)

A close up of a plait of the hair being secured by a pom pom. The pom poms have googly eyes and are red to celebrate red nose day.

I love wearing my hair in bunches and so this double pack of pop pop hair elastics were a must have for me. I adore them, and who can blame me? Claire's make a donation for the sale of these guys too, so it really is a win-win situation.


Have you guys done anything for Red Nose Day?


(In light of recent events, could you please follow my blog on bloglovin'? Just click the button below)
Follow on Bloglovin
Monday, 4 March 2013

NOTD: Confetti Topcoat; A nail varnish wedding!

A union of Nail Varnish


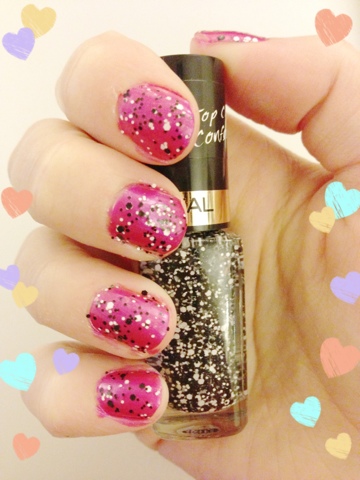
I'm jumping on the confetti bandwagon, and who can blame me? It is amazing! I was a bit put off by the price (£4.99 for a topcoat?!) but when you consider the Illamasqua Speckle nail varnish is £14.50, this varnish is a steal. 


A picture of Model's Own nail varnish and L'Oreal's top coat confetti unopened


I adore Model's Own nail varnish; the colours are always beautiful, the finish is glossy and the application is streak free and dries quickly. I applied the varnish twice for a really deep colour:

A picture of someone holding a pink Model's Own nail varnish bottle showing the colour on the nails

I could easily wear Pink Fever on it's own but I thought it would look great with the confetti top coat..


A picture of pink nails with a black and white confetti effect over the top with hearts surrounding the picture


What do you guys think? Are you loving L'Oreal's Confetti Topcoat and Model's Own Pink Fever as much as me? I never want to take my varnish off again!

Also, did you know you can view this post in the new beauty blogging platform Baobella? Click here to see it!

Thursday, 28 February 2013

NOTD: Barry M Gelly in Greenberry

My NOTD


I went to the dentist earlier in the week and decided I deserved a treat for being so brave.
Enter Barry M's Gelly nail paint in Greenberry;


These photos were taken in natural sunlight and while the Gelly looks more blue in the pictures, it is actually more green in the flesh.

A picture of Roxy's nailed painted in Gelly nail varnish

The colours in the S/S13 Gelly range are GreenBerry (pictured above), Lychee (beige), Papaya (orange) and Dragonfruit (pink). 

A picture of Gelly nail varnish in Greenberry applied to nails


The application process was quite tricky with the Gelly nail varnish. The first coat I applied was streaky and see through and the second coat dragged and become blotchy. The third coat, however, looked perfect not only because it was evenly spread and smooth on the nail.

My mother commented that the finish looked similar to the Shellac nails which is a great result from a £3.99 nail varnish.

Chipping occurred after roughly 3 days on the tips of the nails and the thick varnish got dented slightly (see my index finger in the first picture). 

I've recently purchased the Lychee colour as well so keep an eye on my instagram and twitter for pictures! 


Have you purchased any of the Gelly range? What did you think?
Sunday, 10 February 2013

Boogie Nights; Model's Own and Sally Hanson


This is probably one of my favourite nail looks, just because it's so easy and looks fantastic! 

Roxy's Box of Tricks


 I used Sally Hansen's nail varnish in Bewitched which, I found in Poundland for the grand total of (can you guess?) £1!! I was actually really shocked because Sally Hansen is such a good brand. I think this generation of bbloggers concentrate on newer brands and sometimes forget about good quality varnish like this one. Whilst the colour in the bottle is purple, after two coats on the nail it appears more of a black purple- the perfect base for Boogie Nights.

Boogie Nights is a bblogger favourite, and I can understand why. It's part of Model's Own Mirrorball collection and boasts large glitter flakes with a purple tinge. I find it a bit difficult to get the glitter/nail ratio right as the flakes can just stick together but too much glitter is never a bad thing!

The only problem I have with this look is when I go to remove it as the glitter takes some scrubbing to get it off! Apart from that, I wore my nails like this for a week and a half with no chipping!


What's your favourite nail look?
Monday, 21 January 2013

MUA constellations; Stars in your nails.

 I recently purchased Nail Constellation by MUA in the Scorpio colour scheme. There are five different colour options in the Constellation range; Scorpio, Pisces, Leo, Gemini and Libra. You might have noticed that there's only five out of the twelve constellations so I'm hoping that MUA will expand the range. I went for the Scorpio set because of the colour of the beads; green, gold and pink.


A picture of Opi's Nail Envy, Nail paint by Barry M, Nail constellations and Rimmel pro super wear.

Before I paint my nails, I use 'OPI Nail Envy' nail strengthener. I love this product for a number of reasons; it strengthens my nails, protects them from staining and dries really quickly. To compliment the gold and pink, I paint my nails in 'Barry M's Nail Paint' in colour 334, Teal. In the pictures below, I am wearing two coats of the nail polish for a fantastic deep colour. To protect my nails from chipping, I use 'Rimmel Pro Super Wear', a top coat, which gives a really amazing high shine and protects from chips for roughly ten days.

On my ring finger, once my second coat of nail paint had been applied, I sprinkled the MUA constellations onto the wet nail until it was completely covered. I would advise doing the constellations over a small tray as they do go absolutely everywhere otherwise. Once I was sure that my nail had dried and the constellations had stuck, I gave a quick once over with the Rimmel top coat.


A picture of Barry M's nail paintA picture of MUA constellations in the bottle

I'm really pleased with the result of the nail constellations. It gives my nails a really high end look but on a budget. I would definitely recommend.


Have you used the MUA nail constellations? What did you think? 
Tuesday, 8 January 2013

Viridian nail varnish.


I received an Illamasqua box full of goodies for Christmas. One of the items was the beautiful Illamasqua Viridian nail varnish. The website describes the colour as 'peacock green, metallic finish'  but I would descirbe it more as a dark teal with a shimmer. In natural daylight the varnish looks like a darkened blue but when artificial light or bright sunshine, it looks more of a dark green.

Picture shows two coats of nail varnish.

I used two coats of the nail varnish as I didn't find one coat gave satisfactory colour. It looks fantastic on my pale skin but I imagine it to be great for other skin tones.

The only problem with this product is the price; £13.50 for 5ml 0.5 FL. OZ but the price does match the quality as I had no chipping and the colour remained bright for the entire time I wore it.

Would you fork out £13.50 for a nail varnish or keep to cheaper brands?
Tuesday, 1 January 2013

New year, new start.


Hello! 

Got this lovely Models Own nail varnish set for Christmas. It's a cute gold colour with a handy black nail art pen. The pen has two attachments; a small brush and a fine pen. I decided to give a leopard print    design a go and was surprised how easy it was. Two coats of the gold and for the splurges of black, I used the fine pen attachment and drew a bunch of lopsided C shapes. Super cute and super quick.


The packaged set.

The finished result!


I've order some more Models Own nail varnish and will definitely be making another post about the colours.


Have you tried leopard print nails?

-Roxy
Related Posts Plugin for WordPress, Blogger...